How To Make A Custom Location On Instagram
Over 1 billion monthly active users on Instagram and one rank behind Facebook’s 2.6 billion users, Instagram is one place that you should consider investing in when it comes to your marketing strategy. Especially since with a little research, effort, and a very minimum cost, you can create a plan that gives you a breakthrough in your business’s return on investment.
Creating customer awareness and recognition is a must in any marketing strategy. For a customer to relate to an establishment, they must relate to the location the business is in as well; accessibility of a place is crucial to how a customer sees a company and links to them.
A mentioned location generates significant audience traffic and presence towards your Instagram Account, your Business Website, or even its physical location. It distinguishes you from other businesses, which can boost your marketing influence.
However, Custom Location can have ten-fold impacts on your Business marketing strategy. The location search bar would only have general locations. Making a custom location gives you an individuality that a public site can never offer. To create a new location on Instagram Application, and mention your location name and position, it is easier for your customers to locate, identify, and reach you every time their Location Services is on, and they are nearby.
So, How DO WE Create a Custom Location on Instagram? and use our New Location on Instagram?
Importance of Custom Locations
To create a Custom Location Tag or GeoTag on your Instagram helps amplify your business customer circle. Considering it has become part of the Social Media Culture to gloat and glorify our daily routines, mentioning your locations for authenticity and individuality has become a cultural behavior. Accordingly, it is undeniably paramount for your business to have the Custom Location Tag and take advantage of this new cultural norm.
Once your Custom Location Tag is available, you allow your customers, audiences, and people to search and mention you on their Posts and Stories; this is a great marketing strategy. The process of your audiences noting your GeoTag is called; User Generated Content or UGC.
The process of UGC happens when a customer uses your Custom Location when they come to your establishment. Whether it’s; a fashion house, a restaurant, a café, a small shop, or even a small company, they would be able to share Posts and Stories with your GeoTag included. Like; a picture of a husband and wife at dinner with your Custom Location name and GeoTag included and mentioned as a café or restaurant of choice.
Having a Location Tag is an unrestricted, free, and exceptional strategy to create information, reputation, and marketing resources for your business through what your audiences, customers, and people have been sharing on their Instagram App and Facebook App.
Furthermore, it makes your location more detectable in Search Results on different platforms. Additionally, it gives your business the authenticity, individuality, and description it needs to bring customer awareness. Henceforward, Creating a Custom Location for your Instagram is a MUST for your establishment, especially since it makes it easier for a user’s Location Services to locate and identify your location.

Steps to Creating a Custom Location on Instagram
With a few straightforward steps, You Can Make a Custom Location Tag on Instagram. It is a short and uncomplicated process; that helps amplify your brand recognition by allowing your location tag to be shared, used, and followed by your followers and audiences. However, the process starts by creating your Location on Facebook and then applying it to your Instagram.
So here we go with the steps to creating your custom location tag in 2020.
Step 1: Enabling the Location
First off, you would have to enable your computer or mobile’s Location Services. Your GPS would need to narrow your location so ensure your phone or computer’s Location Services is “turned on” from your device’s setting.
Step 2: Facebook
Well, it’s no secret that Facebook owns Instagram, so its no shocker that the process to create a Custom new Location Tag would involve the use of the Facebook App. It is also a no-brainer that if you have a Business or even a Creator or Influencer account on Instagram, you should have Instagram and Facebook to get the most significant advantage from Social Media Platforms. These platforms complement one another, so having both Instagram and Facebook can significantly leverage your Marketing Strategy.
Consequently, to make a Custom Location Tag, you would need to Login into your Facebook account. If you don’t have an account, you would have to create a new Facebook account first and make sure it is active before starting the process.
Step 3: Check-In
The third step to; create a Custom Location Tag for Instagram is to locate the “Check-In” tab on Facebook. These are the steps to finding it:
- Click on the “What’s on your mind, ……?” bar on the top of your Facebook Home Page.
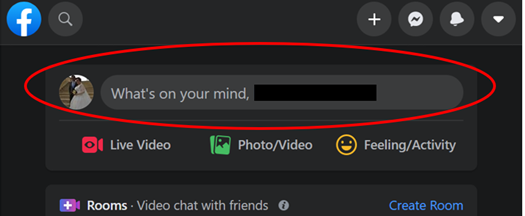
- A “Create Post” window will pop-up.
- Under the “What’s on your mind,….?” Bar, there is a “Add to Your Post” Tab.
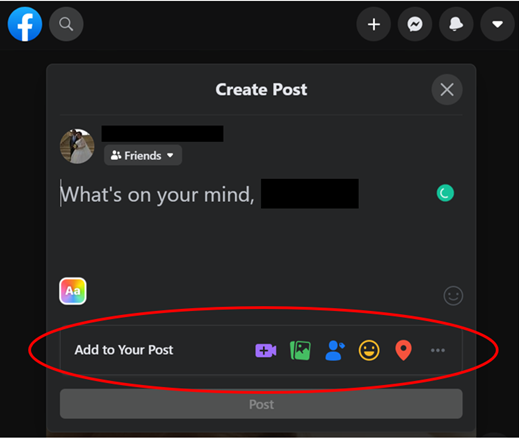
- In the “Add to Your Post” Tab, there are a few shortcut icons.
- The fifth icon from the left is the “Check-In” Icon.

- Once you have found the Check-In Tab, Click on it.
Step 4: Name the Location
Since your GPS Location Services are “turned on,” it would have narrowed in your Facebook location, so type in your business name under the Check-In Tab. Do make sure the GPS Location Services has narrowed down your location on Facebook and is at the right spot of where your company location is.
To exemplify: you don’t want your customers to use the new location later and get the direction to your neighboring business. To create an efficient custom location, you must make sure the right location is selected because it would be critical to your company and the placement of your new location.
Do make sure that there are no typos in your business name, your Capital Letters are in the right place, and the name you use is appropriate and in line with your company.
For example:
DON’T Write: the american fashion house, or
DON’T Write: THE AMERICAN FASHION HOUSE
But Instead, you SHOULD Write The American Fashion House.
Attention to typos is critical because how and what you write would be permanently saved as you create a new Custom Location.
In rare cases that your new location name is taken or previously used, you can use a bit of creativity to create the new location name relevant to your location and organization. For example, if “The American Fashion House” is taken, use “The Original American Fashion House,” “The American Fashion House, The Fashion Corner,” or “The American Fashion House on Westwood, L.A.” This creativity in choosing to create a new name will give you the upper hand while also making you distinctive between all other locations with the same name.
Step 5: Add the Location
Ensure the location cursor is on the right point, and the business’s name is correct. Ignore all the other locations that come up while writing and setting your new location Business Name, if it’s not relevant.
Then, find the “Add Location” Tab on the bottom of the screen. Click on the “Add Location” Tab to add and lock in your location.
Step 6: Category Choice
Once you have added the New Location and the name you have created, the page will take you to a “Category Section.” On this page, you can select the category you want for your business. In the process, you will create and justify your follower base—a clear base for people to identify and relate to your organization and your new location.
Hence, we would recommend that you give your category clear and precise thought. Since the category you choose would determine your business niche and type. You may narrow down your category or select a broad group. It is really up to you, which you may choose depending on your targeted audience.
To exemplify;
If you have a Coffee Shop as a Business, you might want to be under the category of “Café.” But if what you offer is more than just cake and drinks, you may want to be under “Restaurants.”
Regarding The American Fashion House, if you are into Ladies Fashion, you could choose a category in “Ladies Fashion and Accessories,” or instead choose “Retail and Fashion” as your category of choice.
Regardless of your choice, recall that your option identifies and shortlists your target audience and creates your customer circle.

Step 7: A Physical Location
A Physical Location must match your business Precisely; this is critical for your business and can’t be stressed enough. Adding a physical location is instrumental to your return on investment. Because this physical location will pop-up when people:
- People who are trying to find the name of a business in the same category, or one that has been nearby.
- They are trying to pick a place nearby in the same category.
- Or are opening their Location Services and Check-In Tabs, and Nearby Businesses pop-up. This materialization applies to all social media platforms and Location Services.
Consequently, the best tactic you could use as an organization would be to create and pinpoint your physical location clearly and precisely so people nearby could quickly discover your site.
Step 8: Claim the Location
After completing all these steps, there is one last crucial step that you would have to take care of, and that is “Claiming Your Location.” Claiming your location is just as essential and valuable as claiming your business and brand. Not doing so is just like saying; that you do not own that business, and you do not hold any rights to its name.
It would be like you are serving your reputation to other people on a silver platter.
Subsequently, once you have completed the steps above from 1 to 7, claim your Custom Location By:
- Do a “Facebook Search” for the business name you have selected.
- Once your business pops up on the list of searches, “click on it.”
- Now, you will enter the Business Location Page.
- On this page, you would be given a choice to; “Claim the Location.”
- Click on It and Claim Your Custom Location.
Step 9: Custom Location on Instagram
Now that you have your Custom Location on Facebook and your Business Facebook Page, it should also appear on your Instagram Account both for yourself and the general public. Your GeoTag should be accessible for you to use on Instagram Stories and Instagram Posts.
Now you can easily access your Custom Location GeoTag in your Instagram Stories; you can check and access it by:
- Create your content on Instagram Story Post
- Tap on the “Stickers” tab when editing your post.
- Click the Location Sticker.
- Search your Location and Business Name to find it on Instagram
- Click on your Business location.
- Adjust the sticker on your Story Post
- Finally, Post your Story as usual.
Or You could even use your Custom Location in your Instagram Posts by;
- Create a Post on Your Feed as usual by selecting it from your Gallery or Camera.
- Add Filters and Edits
- Add your Captions
- Now add your Location by searching your Business name
- Find and Select your Location
- Finally, Post on your Feed as usual.
- It should appear on Top of your Post.
Now,
You have all the inputs and steps to creating your new Custom Location Tag on Instagram. Henceforth, may the Force be with you in your quest to uplift your Business Name and Marketing Strategy through your New Custom Location Tag on Instagram and Facebook App. Using your new GeoTag Instagram Location, you have just elevated your Social Media Platforms and your brand name and its influence.